Setting up Remote Desktop Protocol (RDP) access on a VPS can feel like a technical hurdle, especially if you’re new to server management. But don’t worry — it’s much easier than it seems. In this guide, we’ll walk you through how to configure RDP access on a VPS on Windows quickly and securely.
Whether you’re running web applications, hosting game servers, or managing client projects, Remote Desktop access allows you to control your server from anywhere. With VPS Malaysia, you’ll enjoy unmatched speed, 99.9% uptime, and 24/7 support, making this process as smooth as possible.
Understanding RDP and Why It Matters
Remote Desktop Protocol (RDP) is a Microsoft-developed protocol that enables users to connect to another computer over a network connection. When using a VPS on Windows, RDP grants you direct graphical access to your server’s desktop environment as if you were sitting in front of it.
Benefits of RDP Access:
- Full administrative control.
- Graphical interface for ease of use.
- Secure and encrypted connection.
- Seamless management from anywhere.
For business owners and developers, RDP is indispensable. It’s your gateway to powerful remote server management. With high-speed NVMe SSD and dedicated IPs, setting up and using your VPS on Windows becomes a high-performance experience.
Prerequisites Before Setup
Before you dive into the setup, ensure the following prerequisites are in place:
1. Active Windows VPS Hosting Plan
You’ll need an active Windows VPS. VPS Malaysia offers various packages with blazing-fast NVMe SSD, ECC REG RAM, and dedicated IPs for optimal performance.
2. RDP Enabled Windows OS
Ensure your Windows VPS version supports RDP access. Most Windows Server editions (2012, 2016, 2019, 2022) have this feature by default.
3. Administrator Access
You must log in with administrator privileges to enable or configure RDP settings.
Once you’re ready, follow the step-by-step process below to activate and connect via RDP.
Step-by-Step: Enable RDP on Your Windows VPS
Setting up RDP on a VPS on Windows takes only a few minutes. Here’s how:
Step 1: Log in to VPS via Console
Use your VPS control panel provided by VPS Malaysia to access the VPS console. This is useful if RDP isn’t already active.
Step 2: Enable Remote Desktop
- Click Start > Server Manager.
- Go to Local Server.
- Find Remote Desktop and click Disabled.
- In the System Properties window, select Allow remote connections to this computer.
- Apply and save changes.
Ensure the option “Allow connections only from computers running Remote Desktop with Network Level Authentication (recommended)” is checked for better security.
Step 3: Allow RDP Through Windows Firewall
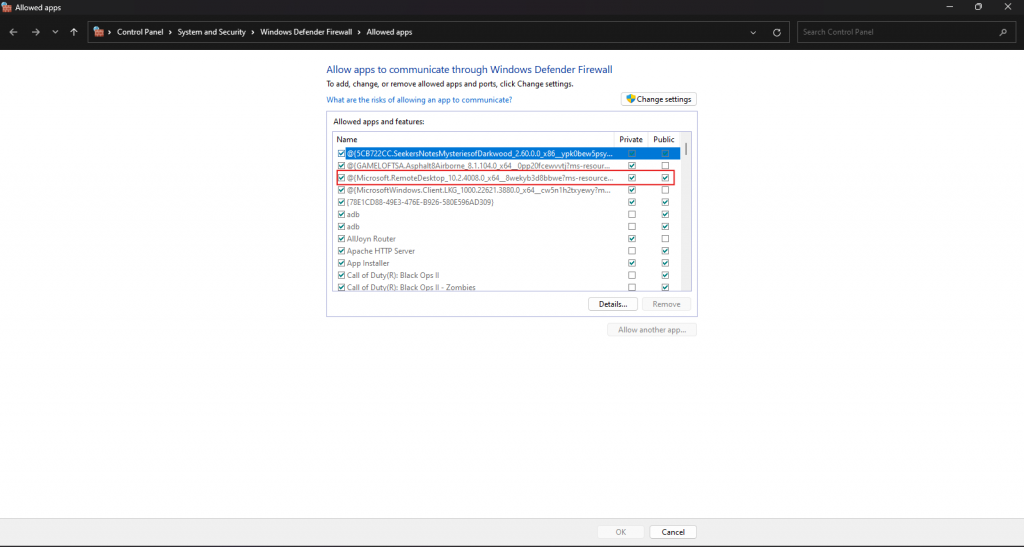
- Open Windows Defender Firewall.
- Click Allow an app or feature through Windows Defender Firewall.
- Find Remote Desktop and check both Private and Public networks.

Step-by-Step: Connect via RDP from Your Local Machine
Once RDP is enabled, you can now connect from your local Windows PC or Mac.
On Windows:
Press Win + R, type mstsc, and press Enter.

Enter the IP address of your VPS.

Enter your login credentials.
On MacOS:
- Download Microsoft Remote Desktop from the App Store.
- Open the app and add your VPS IP.
- Input login credentials and connect.
- Once connected, you’ll be able to manage your VPS on Windows remotely with ease.
Securing Your RDP Connection
While RDP is a powerful tool, it’s essential to secure it to prevent unauthorised access.
Best Practices:
- Change the default RDP port (TCP 3389) to a custom port.
- Use strong, complex passwords.
- Restrict access via firewall (only allow known IPs).
- Enable Network Level Authentication (NLA).
- Install antivirus software and perform regular scans.
VPS Malaysia’s fortified network security and free SSL certificates further strengthen your VPS on Windows security posture.
Troubleshooting Common RDP Issues
1. RDP Not Connecting
- Check if the VPS is powered on via the control panel.
- Verify that firewall rules allow inbound RDP connections.
- Ensure the correct IP and port are being used.
2. Slow RDP Performance
- Upgrade to a higher VPS plan (more RAM or CPU).
- Disable animations and unnecessary services on your server.
3. Credential Issues
- Reset password through VPS Malaysia’s client dashboard.
- Verify that the user has RDP privileges.
The expert support team at VPS Malaysia is available 24/7 to help resolve these issues promptly.
Why Choose VPS Malaysia for Your Windows VPS Hosting?
Not all hosting services are created equal. When setting up a VPS on Windows, you want performance, reliability, and ease of use.

Key Features:
- RAID 10 NVMe SSD, which is 10 times faster than traditional storage.
- 99.9% SLA Guaranteed Uptime.
- 24/7 Expert VPS Support.
- Free Setup & No Contracts.
- Affordable Plans Starting at RM 22.90/month.
With VPS Malaysia, you also get access to a user-friendly control panel, scalable configurations, and a dedicated IP, making it a solid choice for personal projects, business needs, or high-performance applications.
Final Thoughts
Setting up RDP access on your VPS on Windows doesn’t need to be a complex task. In fact, with the right provider and a few simple steps, you can be up and running in minutes. Whether you’re a developer, entrepreneur, or IT pro, having remote access to your Windows VPS can dramatically improve your productivity and project efficiency.
Choose VPS Malaysia for unmatched hosting features, unbeatable uptime, and round-the-clock support. Ready to launch? Get started today and experience the difference.


Leave a Reply